Author Topic: AVAST Installation not successful after uninstalling 360 Total Security  (Read 10422 times)

0 Members and 1 Guest are viewing this topic.

Offline Eddy

  • Avast Evangelist
  • Maybe Bot
  • ***
  • Posts: 31079
  • Watching (over?) you
    • Malware removal, Biljart and other things.
Re: AVAST Installation not successful after uninstalling 360 Total Security
« Reply #30 on: November 06, 2016, 12:25:48 PM »
Quote
The registration is valid till next month, it says.
Sounds like it now is a 30 day trial.
Quote
When I click on register now, I get a "The AAVM subsystem detected a RPC error" message.
Perform a repair of avast.
If that doesn't solve it, perform a clean installation.

REDACTED

  • Guest
Re: AVAST Installation not successful after uninstalling 360 Total Security
« Reply #31 on: November 06, 2016, 06:02:11 PM »

Hi, dbrisendine and Eddy,

Thanks for your advice.

After my last post, I did a "repair" of Avast.  File Sys Shield, Mail Shield, and Web Shield remained OFF. This was my original problem (reported in my first post).

I did a clean install of AVAST. I followed the steps in https://goo.gl/4Ptzkf including the AVASTClear uninstall in safe mode.
I did an off-line AVAST installation using a downloaded 220 MB file. The file is about one month old. The three shields remained OFF. I could not Update at that time. I can try to do that if you think it will be useful.

Thanks again.


Offline dbrisendine

  • Malware Fighter
  • Avast Evangelist
  • Super Poster
  • ***
  • Posts: 1258
Re: AVAST Installation not successful after uninstalling 360 Total Security
« Reply #32 on: November 07, 2016, 06:29:53 AM »
When you uninstalled Avast did Windows Defender turn on or become enabled?

The following scanner will check the state of the services running on your system.


Please download Farbar Service Scanner to your desktop and double click on the file to run it.

Make sure the following options are checked:

Internet Services
Windows Firewall
System Restore
Security Center
Windows Update
Windows Defender
Other Services


Press "Scan".
It will create a log (FSS.txt) in the same directory the tool is run.
Please copy and paste the log to your reply.

Win7 x32 Ult. SP1, Brain 2.0 / Win10 x64, Brain2.5
My help is always free but if you would like to help encourage me or show your thanks -----> DONATE

REDACTED

  • Guest
Re: AVAST Installation not successful after uninstalling 360 Total Security
« Reply #33 on: November 20, 2016, 10:45:01 AM »

Hi dbrisendine and Eddy

Windows  Defender Service has stopped. I checked it first and then ran FSS. All options were checked.

Thank you very much for the help that you continue to give.

The FSS.txt file is below.

Farbar Service Scanner Version: 27-01-2016
Microsoft Windows 7 Ultimate   (X86)
Boot Mode: Normal
****************************************************************

Internet Services:
============

Connection Status:
==============
Localhost is accessible.
LAN connected.
Google IP is accessible.
Google.com is accessible.
Yahoo.com is accessible.


Windows Firewall:
=============

Firewall Disabled Policy:
==================


System Restore:
============

System Restore Policy:
========================


Action Center:
============


Windows Update:
============
wuauserv Service is not running. Checking service configuration:
The start type of wuauserv service is OK.
The ImagePath of wuauserv service is OK.
The ServiceDll of wuauserv service is OK.

BITS Service is not running. Checking service configuration:
The start type of BITS service is OK.
The ImagePath of BITS service is OK.
The ServiceDll of BITS service is OK.


Windows Autoupdate Disabled Policy:
============================


Windows Defender:
==============
WinDefend Service is not running. Checking service configuration:
The start type of WinDefend service is OK.
The ImagePath of WinDefend service is OK.
The ServiceDll of WinDefend service is OK.


Windows Defender Disabled Policy:
==========================


Other Services:
==============


File Check:
========
C:\Windows\system32\nsisvc.dll => File is digitally signed
C:\Windows\system32\Drivers\nsiproxy.sys => File is digitally signed
C:\Windows\system32\dhcpcore.dll => File is digitally signed
C:\Windows\system32\Drivers\afd.sys => File is digitally signed
C:\Windows\system32\Drivers\tdx.sys => File is digitally signed
C:\Windows\system32\Drivers\tcpip.sys => File is digitally signed
C:\Windows\system32\dnsrslvr.dll => File is digitally signed
C:\Windows\system32\dnsapi.dll => File is digitally signed
C:\Windows\system32\mpssvc.dll => File is digitally signed
C:\Windows\system32\bfe.dll => File is digitally signed
C:\Windows\system32\Drivers\mpsdrv.sys => File is digitally signed
C:\Windows\system32\SDRSVC.dll => File is digitally signed
C:\Windows\system32\vssvc.exe => File is digitally signed
C:\Windows\system32\wscsvc.dll => File is digitally signed
C:\Windows\system32\wbem\WMIsvc.dll => File is digitally signed
C:\Windows\system32\wuaueng.dll => File is digitally signed
C:\Windows\system32\qmgr.dll => File is digitally signed
C:\Windows\system32\es.dll => File is digitally signed
C:\Windows\system32\cryptsvc.dll => File is digitally signed
C:\Program Files\Windows Defender\MpSvc.dll => File is digitally signed
C:\Windows\system32\ipnathlp.dll => File is digitally signed
C:\Windows\system32\iphlpsvc.dll => File is digitally signed
C:\Windows\system32\svchost.exe => File is digitally signed
C:\Windows\system32\rpcss.dll => File is digitally signed


**** End of log ****

Offline dbrisendine

  • Malware Fighter
  • Avast Evangelist
  • Super Poster
  • ***
  • Posts: 1258
Re: AVAST Installation not successful after uninstalling 360 Total Security
« Reply #34 on: November 21, 2016, 05:32:24 AM »

Please download "Windows Repair - All in One" from here.  Please choose "Save file.." if you get options to open the file.   Once the download is complete, run the file and install the program on your system.  Please use the default settings for locations as it will help with log retrieval and fixing the registry should anything be needed.

Right click on the desktop shortcut for "Tweaking.com - Windows Repair" and select 'Run as administrator'.

The program will run a self check to make sure that all the correct files are in place for it to run and then it will load the program.  As you can see, there are many steps to take in using this program.  Mainly, the first few steps involve checking for proper Windows files and backing up the system as a precaution.


You can read the notes on the first screen but the important thing to do is click on "ReBoot to Safe Mode" and allow the system to restart itself.  Once the system is started in safe mode and you have logged in (using an administrative level account), restart the program and move onto the Step2 screen.


Please click on "Open Pre-Scan" to load a utility to verify some Windows resource / build files and settings.


Click on "Start Scan" and allow the routine to run.  You can see the status of the checks in the window.


When the routine is finished, it will report on any problems found and you can click on the appropriate repair button if needed.  Once this is done, you can close this window and click on Step3.


Click on the "Check" to see if a repair disk check routine needs to run.  A Command Prompt window will open and you can view the status of the routine.  If the routine finds that repairs need to be made, please select "Open Disk Check at Next Boot" and then click on the "Reboot To Safe Mode" button.  Once the routine(s) completes, please select Step4.


Please click on "Do It" to run a SFC /scannow routine.  If the routine makes any repairs, please reboot your system (again into Safe Mode).  If the routine does not make any repairs, please move onto Step5.


Once there, click on "Backup" under the 1. Registry Backup.  This will make a complete backup of the current registry which can be reloaded should anything go wrong with the repairs that are going to be made.  Next, click on the "Create" under 2. System Restore.  Once both of these backups are made, select Repairs.


I would suggest that you read the Tips For The Best Repairs Results.  Once this is done, click on "Open Repairs".


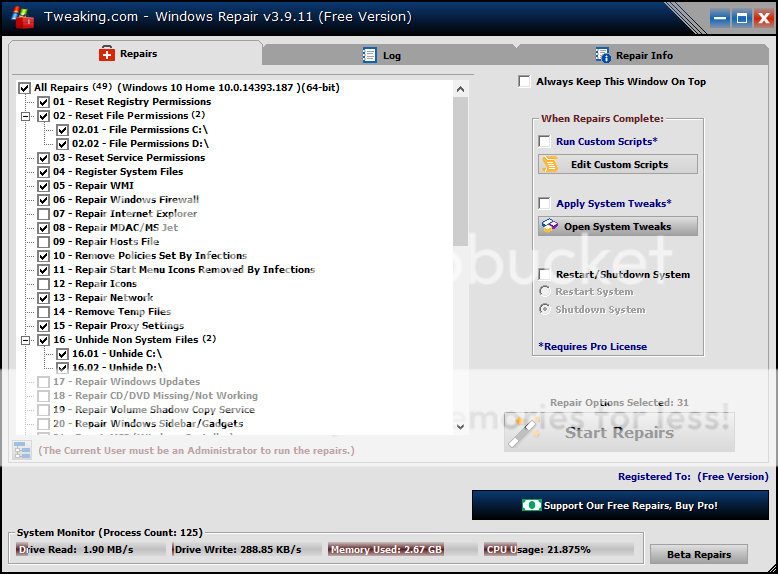
On this screen, uncheck All Repairs and then check All Repairs.  Click "Start Repairs" and confirm that the program starts running the fixes.  This will take a while to run, so you can let it run unattended if you like.  Log files are being recorded as the repairs are being executed.  Once the repairs are finished, reboot your system (normal boot now) and tell me how it is running now.
Win7 x32 Ult. SP1, Brain 2.0 / Win10 x64, Brain2.5
My help is always free but if you would like to help encourage me or show your thanks -----> DONATE